Introduction
In a previous tutorial, you learned how to install Jenkins on a Kubernetes Cluster. In this tutorial, we will create a Jenkins CI/CD pipeline to build a docker image, test it on a staging server to make sure it works as expected, and then push it to Docker Hub.
Prerequisites
- Jenkins installed on a Kubernetes cluster. Refer to this guide for installation
- Jenkins Kubernetes plugin configured as described at Automatic Scaling Jenkins Pods on Kubernetes
- Valid SSH key-value pairs.
How To Create an Nginx Pipeline
In this example, we will be using a Pipeline consisting of 4 steps:
- Git Checkout.
- Build the Docker Image.
- Push Docker Image to Docker Hub.
- Test Nginx Image On Staging Server, stop it, and delete it.
The actual pipeline code can be seen below:
node('master') {
    def ngxImage = 'admintuts/nginx:1.19.6-rtmp-geoip2-alpine'
		stage('Git Checkout'){
			git credentialsId: 'git-hub-credentials', url: 'https://github.com/sceptic30/nginx-rtmp-geoip2-alpine'
		}
		stage('Build Docker Image'){
		    sh "docker build . -t ${ngxImage}"
		}
		stage('Push Docker Image'){
			withCredentials([usernamePassword(credentialsId: 'docker-hub-credentials', passwordVariable: 'dockerHubPass', usernameVariable: 'dockerHubUsrname')]) {
			    sh "docker login -u ${dockerHubUsrname} -p ${dockerHubPass}"
			    sh "docker push ${ngxImage}"
			}
		}
		stage('Test Nginx Image On Staging Server'){
			def dockerRun = "docker run -p 8080:80 -d --name nginx-test ${ngxImage}"
			sshagent(['remote-server-ssh-credentials']) {
			    sh "ssh -o StrictHostKeyChecking=no root@admintuts.net ${dockerRun}"
			    sh 'ssh -o StrictHostKeyChecking=no root@admintuts.net curl -I http://admintuts.net:8080'
			    sh 'ssh -o StrictHostKeyChecking=no root@admintuts.net docker stop nginx-test'
			    sh 'ssh -o StrictHostKeyChecking=no root@admintuts.net docker rm nginx-test'
            }
		}
}
remote-dev-server-credentials is the credentials id withing Jenkins that holds our private key for connecting remotely (passwordless) to our staging server. Keep in mind that passing a secret variable containing sensitive information to “sh” using Groovy String interpolation is insecure. See Jenkins groovy string interpolation documentation for more details.
If everything goes well, you should see something like the image below:
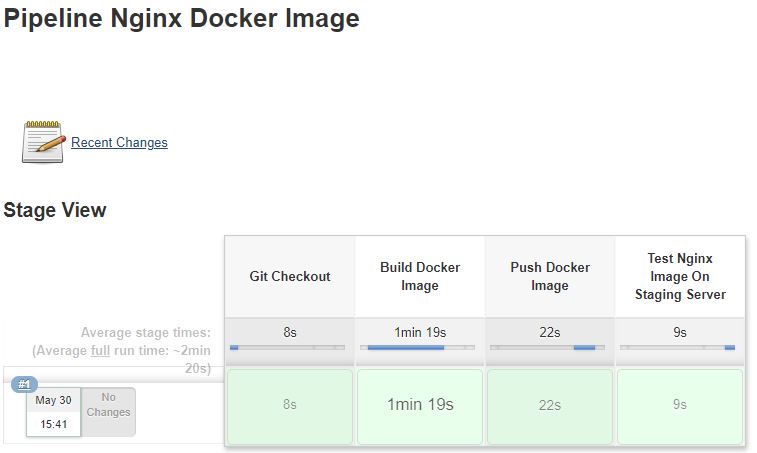
You can clearly see all steps taken by Jenkins, and their corresponding time it took each of them to complete.
Now let’s take a look at a more complicated example
Creating and Deploying a WordPress Image
This scenario consists of 5 stages:
- Checking out a GitHub repository containing the WordPress Dockerfile.
- Build the image.
- Push the image to DockerHub.
- Deploy the image on a staging server.
- Checking the HTTP response.
The problem here is that there is no easy way to pass variables to a YAML file, so we will create a helper bash executable file that will pass the variables that we want. In our case, these variables are the WordPress image and the Nginx Image. Let’s name our bash script docker-compose.sh in the location in your home directory, and give it executable permissions with chmod +x docker-compose.sh
#! /bin/bash

cat > docker-compose.yaml <<EOF
version: '3.3'

services:
  db:
    image: mariadb:10.5.3-bionic
    container_name: db
    hostname: db
    restart: unless-stopped
    env_file: variables/mysql.env
    volumes:
      - ./db-data:/var/lib/mysql
    command: mysqld --max_allowed_packet=128M --character-set-server=utf8 --collation-server=utf8_unicode_ci --init-connect='SET NAMES UTF8;' --innodb-flush-log-at-trx-commit=0
    networks:
      - my-net

  wordpress:
    depends_on:
        - db
    image: ${1}
    container_name: wordpress
    hostname: wordpress
    restart: unless-stopped
    env_file: variables/wordpress.env
    volumes:
      - ./wordpress-data:/var/www/html
      - ./php-conf/php.ini:/usr/local/etc/php/php.ini
    networks:
      - my-net

  webserver:
    depends_on:
      - wordpress
    image: ${2}
    container_name: webserver
    hostname: webserver
    restart: unless-stopped
    ports:
      - "80:80"
      - "443:443"
    volumes:
      - ./certbot/etc/:/etc/letsencrypt
      - ./certbot/var/:/var/lib/letsencrypt
      - ./wordpress-data:/var/www/html
      - ./nginx-conf/nginx.conf:/etc/nginx/nginx.conf
      - ./nginx-conf/fastcgi_config:/etc/nginx/fastcgi_config
      - ./nginx-conf/fastcgi_params:/etc/nginx/fastcgi_params
      - ./nginx-conf/ssl_config:/etc/nginx/ssl_config
      - ./nginx-conf/htpasswd:/etc/nginx/htpasswd
      - ./nginx-conf/sites-enabled:/etc/nginx/sites-enabled
      - ./nginx-conf/ssl:/etc/nginx/ssl
      - ./nginx-conf/snippets:/etc/nginx/snippets
      - ./nginx-conf/blockips.conf:/etc/nginx/blockips.conf
    networks:
      - my-net

  redis:
    depends_on:
      - webserver
    image: redis:6.0.4-alpine
    container_name: redis
    hostname: redis
    restart: unless-stopped
    volumes:
      - ./redis/cache/:/data
    command: redis-server --bind redis --requirepass some_very_long_pass --maxmemory 256mb --maxmemory-policy allkeys-lru --appendonly yes
    ports:
      - "6379:6379"
    networks:
      - my-net

  certbot:
    depends_on:
      - webserver
    image: certbot/certbot
    container_name: certbot
    volumes:
      - ./certbot/etc/:/etc/letsencrypt
      - ./certbot/var/:/var/lib/letsencrypt
      - ./wordpress-data:/var/www/html
    command: renew
    #command: certonly --webroot --webroot-path=/var/www/html --email user@example.com --agree-tos --no-eff-email --force-renewal -d example.com -d www.example.com
    networks:
      - my-net

volumes:
  db-data:
  wordpress-data:
  nginx-conf:
  php-conf:
  redis:
  certbot:

networks:
  my-net:
    driver: bridge
EOF
As you noticed from this file, the WordPress image is assigned with the variable ${1}, and the Nginx image with the variable ${2}, and it will create a file called wordpress-compose.yaml is the same home location.
The wordpress-compose.yaml file will be created automatically when we execute from within our Jenkins pipeline.
./docker-compose.sh ${wordpressImage} ${nginxImage}How To Create A WordPress Pipeline
Enough with the theory, let’s dive into the Jenkins code:
node('jenkins-slave') {
	def wordpressImage = 'admintuts/wordpress:php7.4.12-fpm-redis-alpine'
	def nginxImage = 'admintuts/nginx:1.19.6-rtmp-geoip2-alpine'
	stage('Git Checkout'){
		git credentialsId: 'git-hub-credentials', url: 'https://github.com/sceptic30/wordpress-php-fpm-redis-alpine'
	}
	stage('Build Docker Image'){
		sh 'chmod +x docker-entrypoint.sh'
		sh "docker build . -t ${wordpressImage} --no-cache"
	}
	stage('Push Docker Image'){
		withCredentials([usernamePassword(credentialsId: 'docker-hub-credentials', passwordVariable: 'dockerHubPass', usernameVariable: 'dockerHubUsr')]) {
			sh 'docker login -u ${dockerHubUsr} -p ${dockerHubPass}'
		}
		sh "docker push ${wordpressImage}"
	}
	stage('Deploying WordPress Image On Staging Server'){
		sshagent(['remote-staging-server-credentials']) {
			sh "ssh -o StrictHostKeyChecking=no user@admintuts.net ./docker-compose.sh ${wordpressImage} ${nginxImage}"
			sh 'ssh -o StrictHostKeyChecking=no user@admintuts.net docker-compose -f /home/user/docker/example.com/docker-compose.yaml down'
			sh 'ssh -o StrictHostKeyChecking=no user@admintuts.net rm /home/user/docker/example.com/docker-compose.yaml'
		    sh 'ssh -o StrictHostKeyChecking=no user@admintuts.net mv docker-compose.yaml /home/user/docker/example.com'
		    sh 'ssh -o StrictHostKeyChecking=no user@admintuts.net docker image prune -a -f'
		    sh 'ssh -o StrictHostKeyChecking=no user@admintuts.net docker system prune -f'
		    sh 'ssh -o StrictHostKeyChecking=no user@admintuts.net docker-compose -f /home/user/docker/example.com/docker-compose.yaml up -d'
		}
	}
	stage ('Checking HTTP Responce') {
		sh 'curl -I https://admintuts.net'
	}
}
This example assumes that all docker-compose related files are residing in /home/user/docker/example.com/and that the correct permissions are set.
If everything runs correctly, you will see something like this:

Now you have a fresh working WordPress Installation!