Introduction
In this tutorial you will lean how to set up a mail server running Ubuntu 18.04, using Postfix as an SMTP server, Dovecot for POP/IMAP functionality, and OpenDKIM to digitally sign outgoing emails.
Prerequisites
- Root access, or a non-root user with sudo privileges.
- An SSL enabled domain name. To do that, check out the LetsEncrypt tutorial.
MySQL Database Creation
Before we start installing and configuring Postfix and Dovecot, we will create the database it self, and the necessary tables that will hold domain names, emails and passwords.
Here are the steps to achieve that.
- Login to MySQL:
sudo mysql -u root -p'your_mysql_root_password' - Create the database:
CREATE DATABASE IF NOT EXISTS `emailserver` DEFAULT CHARACTER SET utf8 COLLATE utf8_unicode_ci; USE emailserver; - Create the virtual_aliases table:
CREATE TABLE IF NOT EXISTS `virtual_aliases` ( `id` int(11) NOT NULL AUTO_INCREMENT, `domain_id` int(11) NOT NULL, `source` varchar(100) NOT NULL, `destination` varchar(100) NOT NULL, PRIMARY KEY (`id`), KEY `domain_id` (`domain_id`) ); - Create the virtual_domains table:
CREATE TABLE IF NOT EXISTS `virtual_domains` ( `domain_id` int(11) NOT NULL AUTO_INCREMENT, `domain` varchar(50) NOT NULL, PRIMARY KEY (`domain_id`) ); - Create the virtual_users table that will store email addresses and hashed passwords:
CREATE TABLE IF NOT EXISTS `virtual_users` ( `id` int(11) NOT NULL AUTO_INCREMENT, `domain_id` int(11) NOT NULL, `email` varchar(100) NOT NULL, `password` varchar(106) NOT NULL, PRIMARY KEY (`id`), UNIQUE KEY `email` (`email`), KEY `domain_id` (`domain_id`) ); - Create the helo_access table that will store domains and grant or reject restrictions:
CREATE TABLE IF NOT EXISTS `helo_access` ( `id` int(11) NOT NULL AUTO_INCREMENT, `domain` varchar(50) NOT NULL, `response` varchar(10) NOT NULL, `message` varchar(200) NOT NULL, PRIMARY KEY (`id`) ); - Create the sender_access table that will store domains and grant or reject restrictions:
CREATE TABLE IF NOT EXISTS `sender_access` ( `id` int(11) NOT NULL AUTO_INCREMENT, `email` varchar(50) NOT NULL, `response` varchar(10) NOT NULL, `message` varchar(200) NOT NULL, PRIMARY KEY (`id`) ); - Create the client_access table to store ip addresses:
CREATE TABLE IF NOT EXISTS `client_access` ( `id` int(11) NOT NULL AUTO_INCREMENT, `ip_address` varchar(50) NOT NULL, `response` varchar(10) NOT NULL, `message` varchar(200) NOT NULL, PRIMARY KEY (`id`) ); - Add the foreign keys:
ALTER TABLE `virtual_aliases` ADD CONSTRAINT `virtual_aliases_ibfk_1` FOREIGN KEY (`domain_id`) REFERENCES `virtual_domains` (`domain_id`) ON DELETE CASCADE; ALTER TABLE `virtual_users` ADD CONSTRAINT `virtual_users_ibfk_1` FOREIGN KEY (`domain_id`) REFERENCES `virtual_domains` (`domain_id`) ON DELETE CASCADE; - Create the user that will use the database:
CREATE USER 'emailserveruser'@'localhost' IDENTIFIED BY 'EmailServerUserPassword';
GRANT ALL PRIVILEGES ON `postfix`.* TO 'emailserveruser'@'localhost' WITH GRANT OPTION;
FLUSH PRIVILEGES;
quit
Now take a look at the database tables:
mysql> show tables;
+-------------------+
| Tables_in_postfix |
+-------------------+
| client_access     |
| helo_access       |
| sender_access     |
| virtual_aliases   |
| virtual_domains   |
| virtual_users     |
+-------------------+
6 rows in set (0.00 sec)

mysql> describe client_access;
+------------+--------------+------+-----+---------+----------------+
| Field      | Type         | Null | Key | Default | Extra          |
+------------+--------------+------+-----+---------+----------------+
| id         | int(11)      | NO   | PRI | NULL    | auto_increment |
| ip_address | varchar(50)  | NO   |     | NULL    |                |
| response   | varchar(10)  | NO   |     | NULL    |                |
| message    | varchar(200) | NO   |     | NULL    |                |
+------------+--------------+------+-----+---------+----------------+
4 rows in set (0.00 sec)

mysql> describe helo_access;
+----------+--------------+------+-----+---------+----------------+
| Field    | Type         | Null | Key | Default | Extra          |
+----------+--------------+------+-----+---------+----------------+
| id       | int(11)      | NO   | PRI | NULL    | auto_increment |
| domain   | varchar(50)  | NO   |     | NULL    |                |
| response | varchar(200) | NO   |     | NULL    |                |
| message  | varchar(200) | NO   |     | NULL    |                |
+----------+--------------+------+-----+---------+----------------+
4 rows in set (0.00 sec)

mysql> describe sender_access;
+----------+--------------+------+-----+---------+----------------+
| Field    | Type         | Null | Key | Default | Extra          |
+----------+--------------+------+-----+---------+----------------+
| id       | int(11)      | NO   | PRI | NULL    | auto_increment |
| email    | varchar(50)  | NO   |     | NULL    |                |
| response | varchar(200) | NO   |     | NULL    |                |
| message  | varchar(200) | NO   |     | NULL    |                |
+----------+--------------+------+-----+---------+----------------+
4 rows in set (0.00 sec)

mysql> describe virtual_aliases;
+-------------+--------------+------+-----+---------+----------------+
| Field       | Type         | Null | Key | Default | Extra          |
+-------------+--------------+------+-----+---------+----------------+
| id          | int(11)      | NO   | PRI | NULL    | auto_increment |
| domain_id   | int(11)      | NO   | MUL | NULL    |                |
| source      | varchar(100) | NO   |     | NULL    |                |
| destination | varchar(100) | NO   |     | NULL    |                |
+-------------+--------------+------+-----+---------+----------------+
4 rows in set (0.00 sec)

mysql> describe virtual_domains;
+-----------+-------------+------+-----+---------+----------------+
| Field     | Type        | Null | Key | Default | Extra          |
+-----------+-------------+------+-----+---------+----------------+
| domain_id | int(11)     | NO   | PRI | NULL    | auto_increment |
| domain    | varchar(50) | NO   |     | NULL    |                |
+-----------+-------------+------+-----+---------+----------------+
2 rows in set (0.00 sec)

mysql> describe virtual_users;
+-----------+--------------+------+-----+---------+----------------+
| Field     | Type         | Null | Key | Default | Extra          |
+-----------+--------------+------+-----+---------+----------------+
| id        | int(11)      | NO   | PRI | NULL    | auto_increment |
| domain_id | int(11)      | NO   | MUL | NULL    |                |
| email     | varchar(100) | NO   | UNI | NULL    |                |
| password  | varchar(106) | NO   |     | NULL    |                |
+-----------+--------------+------+-----+---------+----------------+
4 rows in set (0.00 sec)
Populating The Database With Data
Everything looks great at this point. Let’s add some data to the tables:
- Populating virtual_domains table:
INSERT INTO virtual_domains(domain) VALUES ('example.com'), ('example2.com'), ('example3.com'); - Populating virtual_users table:
INSERT INTO virtual_users (domain_id, password , email) VALUES ('1', SHA2('password', CONCAT('$6$', SUBSTRING(SHA(RAND()), -16))), 'admin@example.com'), ('2', SHA2('password', CONCAT('$6$', SUBSTRING(SHA(RAND()), -16))), 'admin@example2.com'), ('3', SHA2('password', CONCAT('$6$', SUBSTRING(SHA(RAND()), -16))), 'admin@example3.com'); - Populating virtual_aliases table:
INSERT INTO virtual_aliases (domain_id,source,destination) VALUES ('1','contact@example1.com','admin@example.com'), ('2','contact@example2.com','admin@exampl2.com'), ('3','contact@example3.com','admin@exampl3.com'); - Populating sender_access table:
INSERT INTO sender_access (email, response, message)
VALUES
('spammer@spam.bad', 'REJECT', 'Sorry you are not allowed to email me hehe :)');
Any email address that you insert in this table, will get rejected, and the spammer (or the person you don’t want to receice emails from) will get an email back from the mailer deamon that will look like this :The response from the remote server was:
554 5.7.1 <spammer@spam.bad>: Sender address rejected: Sorry you are not allowed to email me hehe 🙂 - Populating client_access table:
INSERT INTO client_access (ip_address, response, message) VALUES ('192.168.1.1', 'REJECT', 'Sorry, your ip is banned'); - Populating helo_access table (
xxx.xxx.xxx.xxx= your server ip address):INSERT INTO helo_access (domain, response, message) VALUES ('xxx.xxx.xxx.xxx', 'REJECT', 'Get Lost! You Are Lying About Who You Are'), ('example.1.com', 'REJECT', 'Get Lost! You Are Lying About Who You Are'), ('mail.example1.com', 'REJECT', 'Get Lost! You Are Lying About Who You Are');
Now anyone who tries to ehlo with one of the hostnames that we had defined inside the database (usually spam scripts do that) will get rejected, and will see the “get lost” message. Your own mail servers won’t have that issue, because they will be already have been accepted higher up the list in the Postfix configuration file main.cf.
The virtual_aliases table does basically only a mail forwarding. In the above example, if an incoming mail will arrive for contact@example1.com it will actually be delivered at admin@example1.com mail box, and so on.
Now that we finished adding data, let’s take a lot at our database data:
mysql> SELECT * FROM virtual_domains;
+-----------+--------------+
| domain_id | domain       |
+-----------+--------------+
|         1 | example1.com |
|         2 | exampl2.com  |
|         3 | exampl3.com  |
+-----------+--------------+
3 rows in set (0.00 sec)

mysql> SELECT * FROM virtual_users;
+----+-----------+--------------------+------------------------------------------------------------------------------------------------------------+
| id | domain_id | email              | password                                                                                                   |
+----+-----------+--------------------+------------------------------------------------------------------------------------------------------------+
|  1 |         1 | admin@example1.com | $6$69963f1053d56cd8$MAwOFPWWjhSTNDbo3XR8MoHFGxNGF/2pJr2EqA39DyYI09mb4ImDwETNUWt95rHNC0bK5T8Hbw.Fjsc/ANVM3. |
|  2 |         2 | admin@exampl2.com  | $6$c5761be4cc05a7b3$BiFHAZ5NgxcKJOpiNF00Ubj5mGsnPjspXTki.flod1l6B4b.wqT3Qr4ocgIaXzcwPNus9DcCbFXoP8K05d12V/ |
|  3 |         3 | admin@exampl3.com  | $6$ade3b82e2ce67f4c$KgURGZYAcEY3l9fCHARPbJPrxNRbZ9H.AfMCqalVlhBVzIL./7iWsL6QeRl.YHQbcWLA/Q7UhUqUS62mOQTPb1 |
+----+-----------+--------------------+------------------------------------------------------------------------------------------------------------+
3 rows in set (0.00 sec)

mysql> mysql> SELECT * FROM virtual_aliases;
+----+-----------+----------------------+-------------------+
| id | domain_id | source               | destination       |
+----+-----------+----------------------+-------------------+
|  1 |         1 | contact@example1.com | admin@example1.com |
|  2 |         2 | contact@example2.com | admin@exampl2.com |
|  3 |         3 | contact@example3.com | admin@exampl3.com |
+----+-----------+----------------------+-------------------+
3 rows in set (0.00 sec)

mysql> SELECT * from helo_access;
+----+---------------------+----------+-------------------------------------------+
| id | domain              | response |  message                                  |
+----+---------------------+----------+-------------------------------------------+
|  1 | 95.179.191.245      | REJECT   | Get Lost! You Are Lying About Who You Are |
|  2 | admintuts.net      | REJECT   | Get Lost! You Are Lying About Who You Are |
|  3 | mail.admintuts.net | REJECT   | Get Lost! You Are Lying About Who You Are |
+----+---------------------+------------------------------------------------------+
3 rows in set (0.00 sec)

mysql> mysql> SELECT * from sender_access;
+----+---------------------------+----------+---------------------------------------+
| id | email                     | response |  message                              |
+----+---------------------------+----------+---------------------------------------+
|  1 | spammer@spam.bad          | REJECT   | Sorry you are not allowed to email me |
+----+---------------------------+----------+---------------------------------------+
2 rows in set (0.00 sec)

mysql> SELECT * FROM client_access;
+----+----------------+----------+--------------------------+
| id | ip_address     | response | message                  |
+----+----------------+----------+--------------------------+
|  1 | 192.168.1.1    | REJECT   | Sorry your ip is banned  |
+----+----------------+----------+--------------------------+
2 rows in set (0.01 sec)
MySQL configuration is now finished.
Install Postfix, Dovecot, OpenDKIM & SASL Libraries
sudo apt install postfix dovecot-core dovecot-gssapi dovecot-mysql dovecot-imapd dovecot-lmtpd dovecot-ldap dovecot-pop3d libsasl2-2 sasl2-bin libsasl2-modules sasl2-bin opendkim opendkim-tools -yWhile installation starting up, a screen will show up automatically:
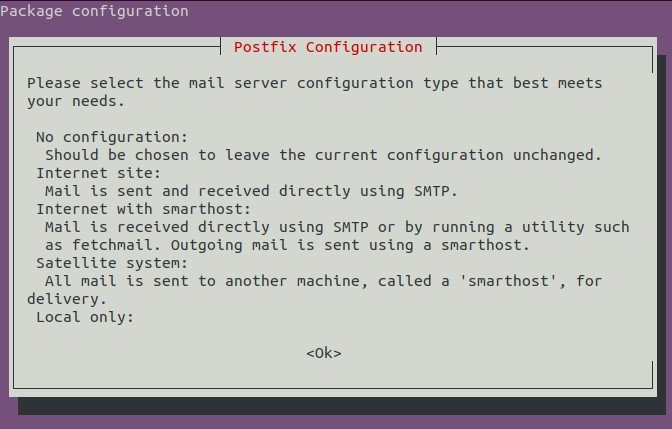
Tab, and click OK. A new screen will appear:
Again, after you click Ok, an other screen will appear:
Fill the corresponding info, and click Ok. Postfix will continue, and finalize it’s installation.
Postfix Configuration
We need to change some basic settings in Postfix configuration file (which resides in /etc/postfix/main.cf, using the command:
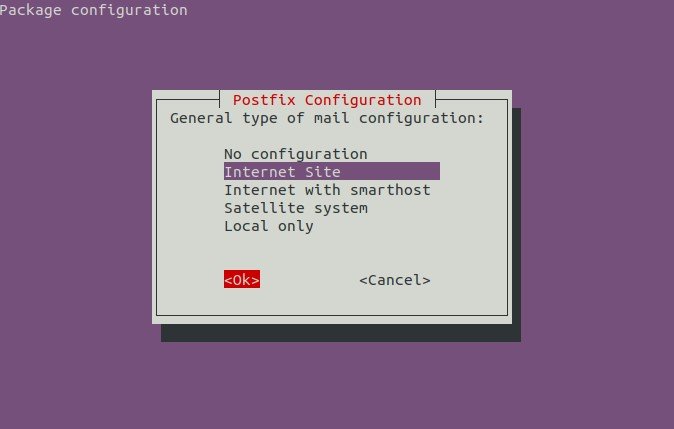
sudo dpkg-reconfigure postfixAnd enter the values below (replace admintuts.net with your own domain name)
- Select
OKto proceed. - Choose
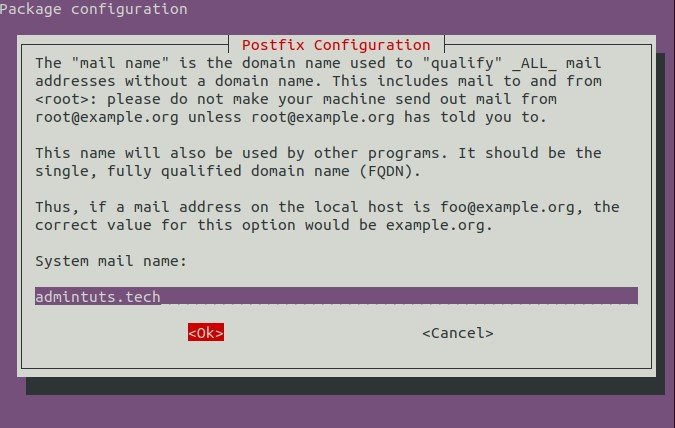
Internet Site. - System Mail Name:
admintuts.net - Root and postmaster mail recipient:
root - Other destinations for mail:
admintuts.net, localhost.admintuts.net, localhost - Force synchronous updates on mail queue?:
No - Local networks:
127.0.0.0/8 [::ffff:127.0.0.0]/104 [::1]/128 - Use procmail for local delivery?:
No - Mailbox size limit (bytes):
0 - Local address extension character: +
- Internet protocols to use:
all
After the initial Postfix configuration has been done, you can change an individual Postfix setting with the command:
sudo postconf -e 'variable = value'For instance:
sudo postconf -e 'inet_protocols = all'
We now have finished installing all software needed. It’s time for some more hardcore configuration.
Detailed Postfix Configs
In Postfix we need to change 2 files, /etc/postfix/main.cf , /etc/postfix/master.cf. After that we need to create 3 files which will be hashed postfix database files, and 1 EHLO database file.
- Edit postfix main config file using the command below:
sudo vi /etc/postfix/main.cfAnd make it look like below, replacing example1.com with your own fully qualified domain name:
# See /usr/share/postfix/main.cf.dist for a commented, more complete version # Debian specific: Specifying a file name will cause the first # line of that file to be used as the name. The Debian default # is /etc/mailname. #myorigin = /etc/mailname smtpd_banner = $myhostname ESMTP $mail_name (Ubuntu) biff = no # appending .domain is the MUA's job. append_dot_mydomain = no # Uncomment the next line to generate "delayed mail" warnings #delay_warning_time = 4h readme_directory = no # TLS parameters smtpd_tls_cert_file=/etc/letsencrypt/live/example.com/fullchain.pem smtpd_tls_key_file=/etc/letsencrypt/live/example.com/privkey.pem smtpd_use_tls=yes smtpd_tls_auth_only = yes smtp_tls_security_level = encrypt smtpd_tls_security_level = encrypt smtpd_sasl_security_options = noanonymous, noplaintext smtpd_sasl_tls_security_options = noanonymous # Authentication smtpd_sasl_type = dovecot smtpd_sasl_path = private/auth smtpd_sasl_auth_enable = yes # See /usr/share/doc/postfix/TLS_README.gz in the postfix-doc package for # information on enabling SSL in the smtp client. # Restrictions smtpd_helo_restrictions = permit_mynetworks, permit_sasl_authenticated, reject_invalid_helo_hostname, reject_unknown_helo_hostname, reject_non_fqdn_helo_hostname, check_helo_access mysql:/etc/postfix/mysql_helo_access.cf smtpd_recipient_restrictions = permit_mynetworks, permit_sasl_authenticated, reject_non_fqdn_recipient, reject_unknown_recipient_domain, reject_unlisted_recipient, reject_unauth_destination, check_client_access mysql:/etc/postfix/mysql_client_access.cf smtpd_sender_restrictions = permit_mynetworks, permit_sasl_authenticated, reject_unknown_client_hostname, reject_unknown_reverse_client_hostname, reject_non_fqdn_sender, reject_unknown_sender_domain, reject_rhsbl_helo dbl.spamhaus.org, reject_rhsbl_reverse_client dbl.spamhaus.org, reject_rhsbl_sender dbl.spamhaus.org, reject_rbl_client zen.spamhaus.org, check_sender_access mysql:/etc/postfix/mysql_sender_access.cf smtpd_relay_restrictions = permit_mynetworks, permit_sasl_authenticated, defer_unauth_destination # See /usr/share/doc/postfix/TLS_README.gz in the postfix-doc package for # information on enabling SSL in the smtp client. mydomain = example.com myhostname = mail.$mydomain alias_maps = hash:/etc/aliases alias_database = hash:/etc/aliases myorigin = $mydomain mydestination = $myhostname, localhost.$mydomain relayhost = mynetworks = 127.0.0.0/8 [::ffff:127.0.0.0]/104 [::1]/128 mailbox_size_limit = 0 recipient_delimiter = + inet_interfaces = all inet_protocols = all # Handing off local delivery to Dovecot's LMTP, and telling it where to store mail virtual_transport = lmtp:unix:private/dovecot-lmtp # Virtual domains, users, and aliases virtual_mailbox_domains = mysql:/etc/postfix/mysql-virtual-mailbox-domains.cf virtual_mailbox_maps = mysql:/etc/postfix/mysql-virtual-mailbox-maps.cf virtual_alias_maps = mysql:/etc/postfix/mysql-virtual-alias-maps.cf, mysql:/etc/postfix/mysql-virtual-email2email.cf # Even more Restrictions and MTA params disable_vrfy_command = yes strict_rfc821_envelopes = yes #smtpd_etrn_restrictions = reject #smtpd_reject_unlisted_sender = yes #smtpd_reject_unlisted_recipient = yes smtpd_delay_reject = yes smtpd_helo_required = yes smtp_always_send_ehlo = yes #smtpd_hard_error_limit = 1 smtpd_timeout = 30s smtp_helo_timeout = 15s smtp_rcpt_timeout = 15s smtpd_recipient_limit = 40 minimal_backoff_time = 180s maximal_backoff_time = 3h # Reply Rejection Codes invalid_hostname_reject_code = 550 non_fqdn_reject_code = 550 unknown_address_reject_code = 550 unknown_client_reject_code = 550 unknown_hostname_reject_code = 550 unverified_recipient_reject_code = 550 unverified_sender_reject_code = 550 smtpd_milters = inet:127.0.0.1:8892 non_smtpd_milters = $smtpd_milters milter_default_action = accept milter_protocol = 2 compatibility_level = 2 - After we need to configure postfix master.cf:
sudo vi /etc/postfix/master.cfAnd make it look like so:
# Postfix master process configuration file. For details on the format # of the file, see the master(5) manual page (command: "man 5 master" or # on-line: http://www.postfix.org/master.5.html). # # Do not forget to execute "postfix reload" after editing this file. # # ========================================================================== # service type private unpriv chroot wakeup maxproc command + args # (yes) (yes) (yes) (never) (100) # ========================================================================== smtp inet n - n - - smtpd #smtp inet n - - - 1 postscreen #smtpd pass - - - - - smtpd #dnsblog unix - - - - 0 dnsblog #tlsproxy unix - - - - 0 tlsproxy submission inet n - y - - smtpd -o syslog_name=postfix/submission -o smtpd_tls_security_level=encrypt -o smtpd_sasl_auth_enable=yes -o smtpd_sasl_type=dovecot -o smtpd_sasl_path=private/auth -o smtpd_reject_unlisted_recipient=no -o smtpd_client_restrictions=permit_sasl_authenticated,reject -o milter_macro_daemon_name=ORIGINATING smtps inet n - - - - smtpd anvil unix - - n - 1 anvil proxymap unix - - n - - proxymap -o syslog_name=postfix/smtps -o smtpd_tls_wrappermode=yes -o smtpd_sasl_auth_enable=yes -o smtpd_sasl_type=dovecot -o smtpd_sasl_path=private/auth -o smtpd_client_restrictions=permit_sasl_authenticated,reject -o milter_macro_daemon_name=ORIGINATING #628 inet n - y - - qmqpd pickup unix n - y 60 1 pickup cleanup unix n - y - 0 cleanup qmgr unix n - n 300 1 qmgr #qmgr unix n - n 300 1 oqmgr tlsmgr unix - - y 1000? 1 tlsmgr rewrite unix - - y - - trivial-rewrite bounce unix - - y - 0 bounce defer unix - - y - 0 bounce trace unix - - y - 0 bounce verify unix - - y - 1 verify flush unix n - y 1000? 0 flush proxymap unix - - n - - proxymap proxywrite unix - - n - 1 proxymap smtp unix - - y - - smtp relay unix - - y - - smtp -o syslog_name=postfix/$service_name # -o smtp_helo_timeout=5 -o smtp_connect_timeout=5 showq unix n - y - - showq error unix - - y - - error retry unix - - y - - error discard unix - - y - - discard local unix - n n - - local virtual unix - n n - - virtual lmtp unix - - y - - lmtp anvil unix - - y - 1 anvil scache unix - - y - 1 scache # # ==================================================================== # Interfaces to non-Postfix software. Be sure to examine the manual # pages of the non-Postfix software to find out what options it wants. # # Many of the following services use the Postfix pipe(8) delivery # agent. See the pipe(8) man page for information about ${recipient} # and other message envelope options. # ==================================================================== # # maildrop. See the Postfix MAILDROP_README file for details. # Also specify in main.cf: maildrop_destination_recipient_limit=1 # maildrop unix - n n - - pipe flags=DRhu user=vmail argv=/usr/bin/maildrop -d ${recipient} # # ==================================================================== # # Recent Cyrus versions can use the existing "lmtp" master.cf entry. # # Specify in cyrus.conf: # lmtp cmd="lmtpd -a" listen="localhost:lmtp" proto=tcp4 # # Specify in main.cf one or more of the following: # mailbox_transport = lmtp:inet:localhost # virtual_transport = lmtp:inet:localhost # # ==================================================================== # # Cyrus 2.1.5 (Amos Gouaux) # Also specify in main.cf: cyrus_destination_recipient_limit=1 # #cyrus unix - n n - - pipe # user=cyrus argv=/cyrus/bin/deliver -e -r ${sender} -m ${extension} ${user} # # ==================================================================== # Old example of delivery via Cyrus. # #old-cyrus unix - n n - - pipe # flags=R user=cyrus argv=/cyrus/bin/deliver -e -m ${extension} ${user} # # ==================================================================== # # See the Postfix UUCP_README file for configuration details. # uucp unix - n n - - pipe flags=Fqhu user=uucp argv=uux -r -n -z -a$sender - $nexthop!rmail ($recipient) # # Other external delivery methods. # ifmail unix - n n - - pipe flags=F user=ftn argv=/usr/lib/ifmail/ifmail -r $nexthop ($recipient) bsmtp unix - n n - - pipe flags=Fq. user=bsmtp argv=/usr/lib/bsmtp/bsmtp -t$nexthop -f$sender $recipient scalemail-backend unix - n n - 2 pipe flags=R user=scalemail argv=/usr/lib/scalemail/bin/scalemail-store ${nexthop} ${user} ${extension} mailman unix - n n - - pipe flags=FR user=list argv=/usr/lib/mailman/bin/postfix-to-mailman.py ${nexthop} ${user} - Create mysql-virtual-mailbox-domains.cf:
sudo vi /etc/postfix/mysql-virtual-mailbox-domains.cfAnd paste the database query info below:
user = emailserveruser password = EmailServerUserPassword hosts = 127.0.0.1 dbname = emailserver query = SELECT 1 FROM virtual_domains WHERE domain='%s' - Create mysql-virtual-mailbox-maps.cf:
sudo vi /etc/postfix/mysql-virtual-mailbox-maps.cfAnd paste the database query info below:
user = emailserveruser password = EmailServerUserPassword hosts = 127.0.0.1 dbname = emailserver query = SELECT 1 FROM virtual_users WHERE email='%s' - Create mysql-virtual-alias-maps.cf:
sudo vi /etc/postfix/mysql-virtual-alias-maps.cfAnd paste the database query info below:
user = emailserveruser password = EmailServerUserPassword hosts = 127.0.0.1 dbname = emailserver query = SELECT destination FROM virtual_aliases WHERE source='%s' - Create mysql-virtual-email2email.cf:
sudo vi /etc/postfix/mysql-virtual-email2email.cfAnd paste the database query info below:
user = emailserveruser password = EmailServerUserPassword hosts = 127.0.0.1 dbname = emailserver query = SELECT email FROM virtual_users WHERE email='%s' - Create mysql_helo_access.cf:
sudo vi /etc/postfix/mysql_helo_access.cfAnd paste the database connection info below:
user = emailserveruser password = EmailServerUserPassword hosts = 127.0.0.1 dbname = emailserver query = SELECT CONCAT(response, ' ', message) AS 'Postfix Response' FROM helo_access WHERE domain='%s' - Create mysql_client_access.cf:
sudo vi /etc/postfix/mysql_client_access.cfAnd paste the database connection and query info like below:
user = emailserveruser password = EmailServerUserPassword hosts = 127.0.0.1 dbname = emailserver query = SELECT CONCAT(response, ' ', message) AS 'Postfix Response' FROM client_access WHERE ip_address='%s' - Create mysql_sender_access.cf:
sudo vi /etc/postfix/mysql_sender_access.cfAnd paste the database connection info below:
user = emailserveruser
password = EmailServerUserPassword
hosts = 127.0.0.1
dbname = emailserver
query = SELECT CONCAT(response, ' ', message) AS 'Postfix Response' FROM sender_access WHERE email='%s'
Creating Postfix Database Mappings
For the above queries to take effect in Postfix, or in other words for posfix to be aware of the database tables that needs to query, we need to create some postfix-only databases in a format that only postfix understands. This can be achieved like so:
sudo postmap /etc/postfix/mysql-virtual-mailbox-domains.cf
sudo postmap /etc/postfix/mysql-virtual-mailbox-maps.cf
sudo postmap /etc/postfix/mysql-virtual-alias-maps.cf
sudo postmap /etc/postfix/mysql-virtual-email2email.cf
sudo postmap /etc/postfix/mysql_helo_access.cf
sudo postmap /etc/postfix/mysql_client_access.cf
sudo postmap /etc/postfix/mysql_sender_access.cf
Dovecot Configuration
- Edit dovecot.conf with:
sudo vi /etc/dovecot/dovecot.confand make it look like this:
!include_try /usr/share/dovecot/protocols.d/*.protocol protocols = imap pop3 lmtp - Edit 10-auth.conf with
sudo vi /etc/dovecot/conf.d/10-auth.confand add
disable_plaintext_auth = yes auth_mechanisms = plain login - Edit 10-mail.conf with
sudo vi /etc/dovecot/conf.d/10-mail.confand add:
mail_location = maildir:~/Maildir
auth_socket_path = /var/run/dovecot/auth-userdb
mbox_write_locks = fcntl
And comment out all other enabled options.
- Edit 10-master.conf with
sudo vi /etc/dovecot/conf.d/10-master.confand make the changes below:
service imap-login { inet_listener imap { port = 0 } inet_listener imaps { port = 993 ssl = yes } # Number of connections to handle before starting a new process. Typically # the only useful values are 0 (unlimited) or 1. 1 is more secure, but 0 # is faster. #service_count = 1 # Number of processes to always keep waiting for more connections. #process_min_avail = 0 # If you set service_count=0, you probably need to grow this. #vsz_limit = $default_vsz_limit } service pop3-login { inet_listener pop3 { port = 0 } inet_listener pop3s { port = 995 ssl = yes } } service lmtp { unix_listener /var/spool/postfix/private/dovecot-lmtp { mode = 0600 user = postfix group = postfix } #Create inet listener only if you can't use the above UNIX socket #inet_listener lmtp { # Avoid making LMTP visible for the entire internet #address = #port = #} } service auth { # auth_socket_path points to this userdb socket by default. It's typically # used by dovecot-lda, doveadm, possibly imap process, etc. Users that have # full permissions to this socket are able to get a list of all usernames and # get the results of everyone's userdb lookups. # # The default 0666 mode allows anyone to connect to the socket, but the # userdb lookups will succeed only if the userdb returns an "uid" field that # matches the caller process's UID. Also if caller's uid or gid matches the # socket's uid or gid the lookup succeeds. Anything else causes a failure. # # To give the caller full permissions to lookup all users, set the mode to # something else than 0666 and Dovecot lets the kernel enforce the # permissions (e.g. 0777 allows everyone full permissions). unix_listener auth-userdb { mode = 0600 user = vmail } # Postfix smtp-auth unix_listener /var/spool/postfix/private/auth { mode = 0600 user = postfix group = postfix } # Auth process is run as this user. user = dovecot } service auth-worker { # Auth worker process is run as root by default, so that it can access # /etc/shadow. If this isn't necessary, the user should be changed to # $default_internal_user. user = vmail } - Edit 10-ssl.conf with:
sudo vi /etc/dovecot/conf.d/10-ssl.confand add:
ssl = required
ssl_cert =  </etc/letsencrypt/live/example.com/cert.pem
ssl_key =  </etc/letsencrypt/live/example.com/privkey.pem
ssl_client_ca_file = /etc/letsencrypt/live/example.com/fullchain.pem
ssl_dh_parameters_length = 2048
ssl_cipher_list = ALL:!kRSA:!SRP:!kDHd:!DSS:!aNULL:!eNULL:!EXPORT:!DES:!3DES:!MD5:!PSK:!RC4:!ADH:!LOW@STRENGTH
ssl_prefer_server_ciphers = yes
The certificate, private key, and fullchain are essential for allowing Dovecot to communicate with Postfix. For configuring your ssl certificates, please take a look at the relevant LetsEncrypt tutorial.
- Edit 20-lmtp.conf with:
sudo vi /etc/dovecot/conf.d/20-lmtp.confand add:
postmaster_address = postmaster@example.com #or any administration email address you wish to. protocol lmtp { mail_plugins = $mail_plugins } - Edit 20-pop3.conf with:
sudo vi /etc/dovecot/conf.d/20-pop3.confand uncomment:
pop3_uidl_format = %08Xu%08Xv - Edit auth-sql.conf.ext like so:
sudo vi /etc/dovecot/conf.d/auth-sql.conf.extAnd make it look like the code below:
passdb { driver = sql # Path for SQL configuration file, see example-config/dovecot-sql.conf.ext args = /etc/dovecot/dovecot-sql.conf.ext } userdb { driver = static args = uid=vmail gid=vmail home=/var/mail/vhosts/%d/%n } - Now we need to edit dovecot-sql.conf.ext:
sudo vi /etc/dovecot/dovecot-sql.conf.extAnd make sure the sql queries looks like below:
driver = mysql connect = host=127.0.0.1 dbname=emailserver user=emailserveruser password=EmailServerUserPassword default_pass_scheme = SHA512-CRYPT password_query = SELECT email as user, password FROM virtual_users WHERE email='%u'; - Lastly we need to create the vmail group with ID 5000, and add the user vmail to the vmail group. This system user will be responsible for reading emails from the server.
sudo groupadd -g 5000 vmail
sudo useradd -g vmail -u 5000 vmail -d /var/mail
And change the owner of the /var/mail/ folder and its contents in order to below to vmail system user:
sudo chown -R vmail:vmail /var/mail
A this point we are done configuring Dovecot.
OpenDKIM Configuration
Unfortunately OpenDKIM does not install with all the required folders autocreated, so we need to do that our selfes. Let’s do that following the steps below:
- Create the necessary folders:
sudo mkdir /etc/opendkim sudo mkdir /etc/opendkim/keys sudo touch /etc/opendkim/KeyTable sudo touch /etc/opendkim/SigningTable sudo touch /etc/opendkim/TrustedHosts - Give opendkim user, ownership of it’s own folder recursively:
sudo chown opendkim:opendkim -R /etc/opendkim - Now its time to create out private and public key. We do that like so:
sudo mkdir /etc/opendkim/keys/example.com cd /etc/opendkim/keys/example.com sudo opendkim-genkey -b 2048 -h rsa-sha256 -r -s email -d example.com -v#-r is the selector which will be used for signing the emails - KeyTable Creation:
sudo echo "email._domainkey.example.com example.com:email:/etc/opendkim/keys/example.com/email.private" >> /etc/opendkim/KeyTable - Signing Table Creation:
sudo echo "*@example.com email._domainkey.example.com" >> /etc/opendkim/SigningTable - TrustedHosts file creation:
sudo echo "*example.com" >> /etc/opendkim/TrustedHosts - Main OpenDKIM configuration file. This is located in /etc/opendkim.conf. For your convenience is show below:
# This is a basic configuration that can easily be adapted to suit a standard
# installation. For more advanced options, see opendkim.conf(5) and/or
# /usr/share/doc/opendkim/examples/opendkim.conf.sample.

# Log to syslog
Syslog                  yes
# Required to use local socket with MTAs that access the socket as a non-
# privileged user (e.g. Postfix)
UMask                  002
TemporaryDirectory /var/tmp

##  PidFile filename
###      default (none)
###
###  Name of the file where the filter should write its pid before beginning
###  normal operations.
#
PidFile               /var/run/opendkim/opendkim.pid

# Commonly-used options; the commented-out versions show the defaults.
#Canonicalization       simple
Mode                   sv
SubDomains             no
SignatureAlgorithm     rsa-sha256

##  Log additional entries indicating successful signing or verification of messages.
SyslogSuccess   yes
##  If logging is enabled, include detailed logging about why or why not a message was
##  signed or verified. This causes an increase in the amount of log data generated
##  for each message, so set this to No (or comment it out) if it gets too noisy.
LogWhy  yes

##  Attempt to become the specified user before starting operations.
UserID  opendkim

# Sign for example.com with key in /etc/dkimkeys/dkim.key using
# selector '2007' (e.g. 2007._domainkey.example.com)
#Domain                 example.com
#KeyFile                /etc/dkimkeys/dkim.key
#Selector               2007


##  Create a socket through which your MTA can communicate.
Socket  inet:8892@127.0.0.1

##  Specifies whether or not the filter should generate report mail back
##  to senders when verification fails and an address for such a purpose
##  is provided. See opendkim.conf(5) for details.
SendReports     yes

##  Specifies the sending address to be used on From: headers of outgoing
##  failure reports.  By default, the e-mail address of the user executing
##  the filter is used (executing_user@hostname).
# ReportAddress "Example.com Postmaster" <postmaster@example.com>

##  Add a DKIM-Filter header field to messages passing through this filter
##  to identify messages it has processed.
SoftwareHeader  yes

# Always oversign From (sign using actual From and a null From to prevent
# malicious signatures header fields (From and/or others) between the signer
# and the verifier.  From is oversigned by default in the Debian pacakge
# because it is often the identity key used by reputation systems and thus
# somewhat security sensitive.
OversignHeaders  From


##  Selects the canonicalization method(s) to be used when signing messages.
Canonicalization        relaxed/simple
AutoRestart             Yes
AutoRestartRate         10/1h

Selector        email

##  Specifies the minimum number of key bits for acceptable keys and signatures.
MinimumKeyBits  1024

##  Gives the location of a private key to be used for signing ALL messages. This
##  directive is ignored if KeyTable is enabled.
#KeyFile        /etc/opendkim/keys/email.private

##  Gives the location of a file mapping key names to signing keys. In simple terms,
##  this tells OpenDKIM where to find your keys. If present, overrides any KeyFile
##  directive in the configuration file. Requires SigningTable be enabled.
KeyTable        refile:/etc/opendkim/KeyTable

##  Defines a table used to select one or more signatures to apply to a message based
##  on the address found in the From: header field. In simple terms, this tells
##  OpenDKIM how to use your keys. Requires KeyTable be enabled.
SigningTable    refile:/etc/opendkim/SigningTable

##  Identifies a set of "external" hosts that may send mail through the server as one
##  of the signing domains without credentials as such.
ExternalIgnoreList      refile:/etc/opendkim/TrustedHosts

##  Identifies a set "internal" hosts whose mail should be signed rather than verified.
InternalHosts   refile:/etc/opendkim/TrustedHosts


##  ResolverConfiguration filename
##      default (none)
##
##  Specifies a configuration file to be passed to the Unbound library that
##  performs DNS queries applying the DNSSEC protocol.  See the Unbound
##  documentation at http://unbound.net for the expected content of this file.
##  The results of using this and the TrustAnchorFile setting at the same
##  time are undefined.
##  In Debian, /etc/unbound/unbound.conf is shipped as part of the Suggested
##  unbound package

# ResolverConfiguration     /etc/unbound/unbound.conf

##  TrustAnchorFile filename
##      default (none)
##
## Specifies a file from which trust anchor data should be read when doing
## DNS queries and applying the DNSSEC protocol.  See the Unbound documentation
## at http://unbound.net for the expected format of this file.

#TrustAnchorFile       /usr/share/dns/root.key
</postmaster@example.com>
Congrats! You will now be able to digitally sign the mails you send with OpenDKim! Restart all configured services for the new changes to take effect:
sudo service postfix restart
sudo service dovecot restart
sudo service opendkim restart
Email DNS Configuration
All aspects of our software is now configured, but for our email system to work correctly as a whole, we need to add the requied DNS entries to our webhost. Login to your hosting account and find the DNS entries where you state your records and add:
- Type A, Name=mail, Data=YourServerIp.
- Type CCA, Name=YourDomain, Data=0 issue “letsencrypt.org”.
- Type MX, Name=YourDomain, Data=mail.YourDomain.
- Type TXT, Name=YourDomain, Data=v=spf1 mx a ip4:YourServerIp ~all
- Type TXT, Name=email._domainkey, Data=YourOpenDKIM public key
- Type TXT, Name=_dmarc, Data=v=DMARC1;p=reject;rua=mailto:postmaster@example.com;pct=100;ruf=mailto:postmaster@example.com;sp=none;fo=0:d:s;aspf=r;adkim=r;
And that will be all. DNS records are not configured. If you send a test email to a gmail account, you will see that the email is encrypted, and digitally signed. For further testing you can use Port25 Authentication Checker.
Email Client Configuration
If you want to set up and configure an email client for sending and receiving emails, follow the RoundCube Tutorial, to have everything up and running fast.
Happy Emailing!