
Nginx, PHP-FPM, and MySQL Installation Tutorial
Nginx (pronounced “engine x”) is free and open-source software, high-performance HTTP and reverse proxy server. Its configuration is made with configuration files (.conf) at which we will take a look later on. The most powerful features of Nginx, it’s the stability that provides, a considerable large number of modules available to be built with, simple configuration, and low resource consumption. This tutorial shows how you can install Nginx on an Ubuntu 18.04 LTS server with PHP 7.4 support. Let’s begin!
Prerequisites
- Obviously Ubuntu 18.04 LTS Server.
- Vi Editor.
- Root access.
Adding A User To The System
Adding a user to the system is considered a good practice for security reasons since we won’t be using the generally known users “www-data” and “nginx” system users: For the sake of this tutorial i will use a random name, “nikolas”. Our website files will reside on /home/nikolas/example.com/html_public which is a typical location. First you will need to login as root just for once, and create a user:
root@admintuts:~$ sudo adduser nikolas
Adding user `nikolas' ...
Adding new group `nikolas' (1004) ...
Adding new user `nikolas' (1004) with group `nikolas' ...
Creating home directory `/home/nikolas' ...
Copying files from `/etc/skel' ...
Enter new UNIX password:
Retype new UNIX password:
passwd: password updated successfully
Changing the user information for nikolas
Enter the new value, or press ENTER for the default
    Full Name []:
    Room Number []:
    Work Phone []:
    Home Phone []:
    Other []:
Is the information correct? [Y/n] Y
And afterwards, we add the user=nikolas to the sudo group while switching accounts using -su command:
root@admintuts:~$ usermod -aG sudo nikolas
root@admintuts:~$ su nikolas
nikolas@admintuts:/root$ cd
nikolas@admintuts:~$
Nginx Installation
Once you have logged in with SSH to your server, install the Nginx PPA using the commands:
nikolas@admintuts:~$ sudo add-apt-repository ppa:nginx/stable
nikolas@admintuts:~$ sudo apt update
nikolas@admintuts:~$ sudo apt upgrade -y
nikolas@admintuts:~$ sudo apt install nginx
After installation is complete, run the below commands to start Nginx, and to make sure it’s running during system start up. And eventually, check Nginx’s version:
nikolas@admintuts:~$ sudo systemctl start nginx
nikolas@admintuts:~$ sudo systemctl enable nginx
Synchronizing state of nginx.service with SysV service script with /lib/systemd/systemd-sysv-install.
Executing: /lib/systemd/systemd-sysv-install enable nginx
nikolas@admintuts:~$ sudo nginx -v
nginx version: nginx/1.16.1
If you are logged in as root, you won’t need to type “sudo” before the actual command. If you are logged in as an other user, then sudo is needed before the command to avoid providing password each time a command is issued.
For sake of security, we will enable Ubuntu Firewall by adding SSH and HTTP service ports to the firewall configuration.
nikolas@admintuts:~$ sudo ufw allow ssh
Rules updated
Rules updated (v6)
nikolas@admintuts:~$ sudo ufw allow http
Rules updated
Rules updated (v6)nikolas@admintuts:~$ sudo ufw enable
Firewall is active and enabled on system startupMySQL Installation
To install MySQL, issue the command:
nikolas@admintuts:~$ sudo apt install mysql-server mysql-client -yAfter the installation is completed, start the MySQL service, and enable it during start up:
nikolas@admintuts:~$ sudo systemctl start mysqlsudo systemctl enable mysql
Synchronizing state of mysql.service with SysV service script with /lib/systemd/systemd-sysv-install.
Executing: /lib/systemd/systemd-sysv-install enable mysqlAfter you will need to secure MySQL. You can do that using the follow command:
nikolas@admintuts:~$ sudo mysql_secure_installation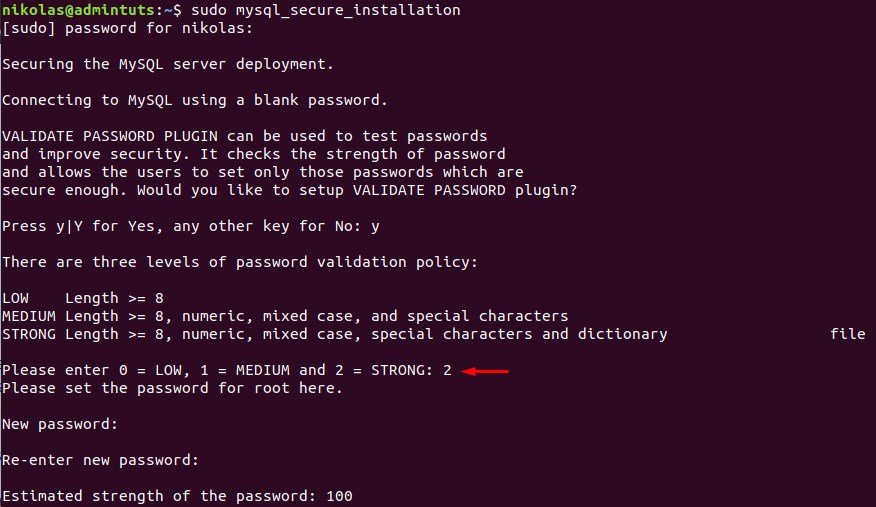
Choose “Yes” for using the Validate Password Plugin, and then also choose the option “2“, and provide a 16 character password with mixed lowercase, uppercase, and special characters. As you can see in the picture above, the password strength that i provided has a value of 100.
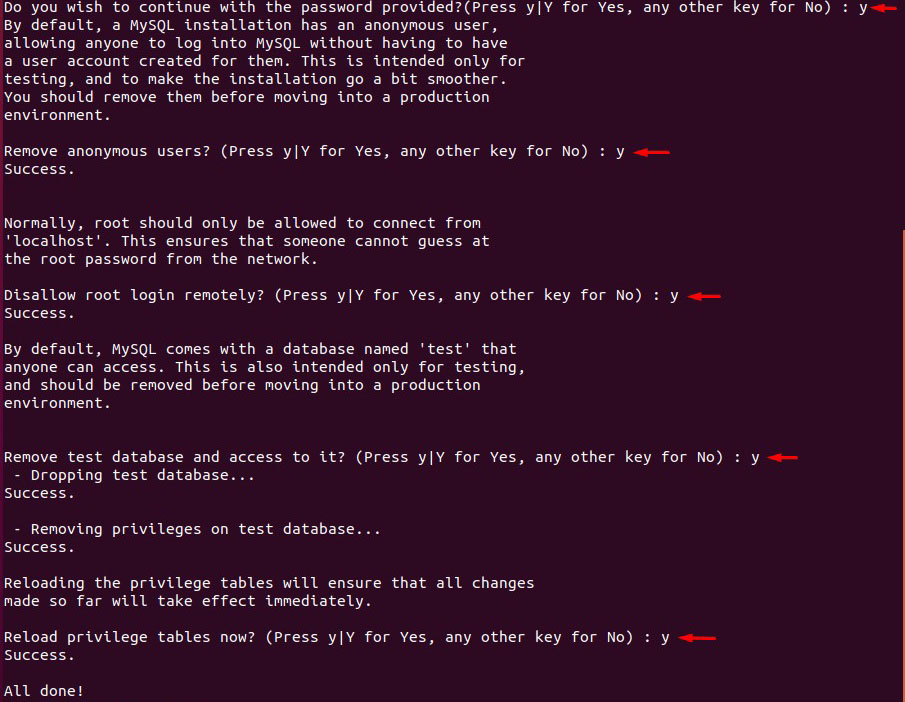
Afterwards, you need to do 5 things.
- Continue using the strong password we already created.
- Remove anonymous users.
- Disallow root logins remotely.
- Remove test database and access to it.
- Lastly, reload privilege tables.
PHP-FPM Installation
First, you will need to update our system (just in case).
nikolas@admintuts:~$ sudo apt install software-properties-commonNext, you will have to install a specific php PPA.
nikolas@admintuts:~$ sudo add-apt-repository ppa:ondrej/phpIf you receive a message that some packages are upgradable, run the command:
nikolas@admintuts:~$ sudo apt upgradeNext, you are free to install PHP7.4. Issue the following command:
nikolas@admintuts:~$ sudo apt install php7.4 php7.4-fpm php7.4-mysql php7.4-cli php-common php7.4-common php7.4-json php7.4-xml php7.4-xmlrpc php7.4-opcache php7.4-readline libpcre2-8-0 php-pear php7.4-opcache php7.4-bcmath php-curl php7.4-curl php7.4-gd php7.4-mbstring php7.4-zip php7.4-bz2 mcrypt php-gmp php-mbstring php-gd php-tcpdf php-zip -yHow To Change Php Version On Ubuntu
Now, in case your server already has an older version of PHP installed, you will have to change the active PHP version your system is using, to the newly installed version 7.4. You do that as follows:
nikolas@admintuts:~$ sudo update-alternatives --config phpAnd you just choose from the options you see, with the latest. In our case php7.4.
Checking the PHP version now:
nikolas@admintuts:~$ php -v
PHP 7.4.14 (cli) (built: Jan 7 2021 17:50:32) ( NTS )
Copyright (c) The PHP Group
Zend Engine v3.4.0, Copyright (c) Zend Technologies
with Zend OPcache v7.4.14, Copyright (c), by Zend Technologies
Php is installed!
Now you should set php7.4-fpm to start on system reboot. Run the command:
nikolas@admintuts:~$ sudo systemctl start php7.4-fpm && sudo systemctl enable php7.4-fpmSynchronizing state of php7.4-fpm.service with SysV service script with /lib/systemd/systemd-sysv-install.
Executing: /lib/systemd/systemd-sysv-install enable php7.4-fpmNow, use the netstat command to see php’s network connections.
sudo netstat -pl | grep phpnikolas@admintuts:~$ sudo netstat -pl | grep php
unix 2 [ ACC ] STREAM LISTENING 23504 1864/php-fpm: maste /run/php/php7.4-fpm.sockAs you can see, PHP-fpm is listening to a UNIX socket and gives us the full location on disk. We will use that specific socket in our Nginx configuration later.
Nginx Configuration
Nginx is by default installed at /etc/ngix. Let’s open the main configuration file using vi editor:
nikolas@admintuts:~$ cd /etc/nginx
nikolas@admintuts:/etc/nginx$ sudo vi nginx.conf
Now, instead of just telling you to uncomment various lines in the default nginx.conf file that ships with Nginx installation, I will give you production-ready configuration files.
Copy the code you see below and paste it to nginx.conf:
user  nikolas;
worker_processes  1; # the number of cores you want to use. Use "auto" to use the maximum number of cpu cores.
error_log  /var/log/nginx/error.log error;
pid        /var/run/nginx.pid;
events {
    worker_connections  1024;
}
http {
    map_hash_max_size 262144;
    map_hash_bucket_size 262144;
    types_hash_bucket_size 256;
    server_names_hash_bucket_size 256;
    sendfile    on;
    tcp_nodelay on;
    tcp_nopush  off;
    autoindex off;
    server_tokens off;
    keepalive_timeout  15;
    client_max_body_size 100m;
	#Just in case you want to use websockets
	map $http_upgrade $connection_upgrade {
		default upgrade;
		'' close;
	}
	include       /etc/nginx/mime.types;
	default_type  application/octet-stream;

	log_format  main '$remote_addr - $remote_user [$time_local] "$request" '
					 '$status $body_bytes_sent "$http_referer" '
                     '"$http_user_agent" "$http_x_forwarded_for"';
	access_log  /var/log/nginx/access.log  main;
    #=============Basic Compression=====================
	gzip on;
	gzip_static on;
	gzip_disable "msie6";
	gzip_vary on;
	gzip_proxied any;
	gzip_comp_level 6;
	gzip_buffers 16 8k;
	gzip_http_version 1.1;
	gzip_types text/css text/xml text/plain application/javascript image/jpeg image/png image/gif image/x-icon image/svg+xml image/webp application/font-woff application/json application/vnd.ms-fontobject application/vnd.ms-powerpoint;
	#===virtual hosts configuration files===
	include /etc/nginx/sites-enabled/*;
}
And now the actual virtual host code. For simplicity and maintainability reasons, its a good idea to use your domain name as the name of the file. For example if your domain is example.com, would be a good idea to use example.conf as configuration file for your virtual host. Let’s change directory:
nikolas@admintuts:/etc/nginx$ cd sites-enabled
nikolas@admintuts:/etc/nginx/sites-enabled$
There, you will see a default file that you are free to delete. The code given below includes SSL configuration (using Let’s Encrypt) as well, since it tends to be a standard these days. It also includes some optimizations. These are redirects from www to non-www, redirecting the site’s IP address to the domain name, etc.
Nginx Virtual Host Configuration
Create a config file example.conf:
server {
server_name xxx.xxx.xxx.xxx;
listen 80;
#listen 443 ssl http2;
#ssl_certificate /etc/letsencrypt/live/example.com/fullchain.pem;
#ssl_certificate_key /etc/letsencrypt/live/example.com/privkey.pem;
return 301 http://example.com$request_uri; #replace http with https after you obtain the ssl certificate
}
server {
    server_name www.example.com;
    listen 80;
    #listen 443 ssl http2;
    listen [::]:80;
    #listen [::]:443 ssl http2;
    #add_header Strict-Transport-Security 'max-age=31536000; includeSubDomains; preload';
    #ssl_prefer_server_ciphers on;
    #ssl_ciphers "EECDH+AESGCM:EDH+AESGCM:AES256+EECDH:AES256+EDH";
    #ssl_protocols TLSv1.2 TLSv1.1 TLSv1;
    #ssl_session_cache   shared:SSL:10m;
    #ssl_session_timeout 10m;
    keepalive_timeout   70;
    #ssl_buffer_size 1400;
    #ssl_dhparam /etc/ssl/nginxdhparam.pem
    #ssl_stapling on;
    #ssl_stapling_verify on;
    #resolver 8.8.8.8 8.8.4.4 valid=86400;
    #resolver_timeout 10;
    #ssl_certificate /etc/letsencrypt/live/example.com/fullchain.pem;
    #ssl_certificate_key /etc/letsencrypt/live/example.com/privkey.pem;
    # Non-www redirect
    return 301 http://example.com$request_uri; #replace http with https after you obtain the ssl certificate
}
server {
    server_name  example.com;
    listen       *:80;
    return 301   http://example.com$request_uri;
}
server {
    server_name example.com;
    #listen 443 ssl http2;
    #listen [::]:443 ssl http2;
    root /home/nikolas/example.com/html_public; #this is the location of disk of where your sites files reside
    charset UTF-8;
    #add_header Strict-Transport-Security 'max-age=31536000; includeSubDomains; preload';
    add_header X-Frame-Options SAMEORIGIN;
    add_header X-Content-Type-Options nosniff;
    add_header X-XSS-Protection "1; mode=block";
    add_header Referrer-Policy no-referrer;
    #ssl_prefer_server_ciphers on;
    #ssl_ciphers "EECDH+AESGCM:EDH+AESGCM:AES256+EECDH:AES256+EDH";
    #ssl_protocols TLSv1.2 TLSv1.1 TLSv1;
    #ssl_session_cache   shared:SSL:10m;
    #ssl_session_timeout 10m;
    #keepalive_timeout   70;
    #ssl_buffer_size 1400;
    #ssl_dhparam /etc/ssl/nginxdhparam.pem
    #ssl_stapling on;
    #ssl_stapling_verify on;
    #resolver 8.8.8.8 8.8.4.4 valid=86400;
    #resolver_timeout 10;
    #ssl_certificate /etc/letsencrypt/live/example.com/fullchain.pem;
    #ssl_certificate_key /etc/letsencrypt/live/example.com/privkey.pem;
    #ssl_trusted_certificate /etc/letsencrypt/live/example.com/fullchain.pem;
location ~* .(jpg|jpe?g|gif|png|ico|cur|gz|svgz|mp4|ogg|ogv|webm|htc|css|js|otf|eot|svg|ttf|woff|woff2)(?ver=[0-9.]+)?$ {
    expires modified 1M;
    add_header Access-Control-Allow-Origin '*';
    add_header Pragma public;
    add_header Cache-Control "public, must-revalidate, proxy-revalidate";
    access_log off;
    }
    #access_log  logs/host.access.log  main;
    #===Let's Encrypt Hidden Directory==============
    location ~ /.well-known {
        allow all;
    }
location / {
    index index.php;
    try_files $uri $uri/ /index.php?$args; #WordPress Syntax for try_files directive;
    }
error_page  404    /404.php;
#pass incoming requests to PHP-FPM service listening on a unix socket
location ~ .php$ {
    try_files       $uri =404;
    fastcgi_index   index.php;
    fastcgi_pass    unix:/run/php/php7.3-fpm.sock;
    fastcgi_split_path_info ^(.+.php)(/.+)$;
    fastcgi_param   SCRIPT_FILENAME  $document_root$fastcgi_script_name;
    fastcgi_intercept_errors on;
    fastcgi_ignore_client_abort off;
    fastcgi_connect_timeout 60;
    fastcgi_send_timeout 180;
    fastcgi_read_timeout 180;
    fastcgi_buffer_size 128k;
    fastcgi_buffers 4 256k;
    fastcgi_busy_buffers_size 256k;
    fastcgi_temp_file_write_size 256k;
    include fastcgi_params;
}
location = /robots.txt {
    access_log off;
    log_not_found off;
    }
location ~ /. {
    deny  all;
    access_log off;
    log_not_found off;
    }
}
Note: the ssl_dhparam can be created like so:
nikolas@admintuts:~$ sudo openssl dhparam -out /etc/ssl/nginxdhparam.pem 4096Nginx Service Verification
Replace “example.com” with your domain, uncomment the SSL configuration lines if you using SSL, and save the file and exit. Then check for config errors, reload Nginx, and check it’s status using the commands below:
nikolas@admintuts:/etc/nginx/sites-enabled$ sudo nginx -t
nginx: the configuration file /etc/nginx/nginx.conf syntax is ok
nginx: configuration file /etc/nginx/nginx.conf test is successful
nikolas@admintuts:/etc/nginx/sites-enabled$ sudo systemctl reload nginx
nikolas@admintuts:/etc/nginx/sites-enabled$ sudo systemctl status nginx
● nginx.service - A high performance web server and a reverse proxy server
   Loaded: loaded (/lib/systemd/system/nginx.service; enabled; vendor preset: enabled)
   Active: active (running) since Sun 2019-09-08 21:39:21 EEST; 1min 12s ago
     Docs: man:nginx(8)
  Process: 4719 ExecStop=/sbin/start-stop-daemon --quiet --stop --retry QUIT/5 --pidfile /run/nginx.pid (code=exited, status
  Process: 4762 ExecReload=/usr/sbin/nginx -g daemon on; master_process on; -s reload (code=exited, status=0/SUCCESS)
  Process: 4730 ExecStart=/usr/sbin/nginx -g daemon on; master_process on; (code=exited, status=0/SUCCESS)
  Process: 4720 ExecStartPre=/usr/sbin/nginx -t -q -g daemon on; master_process on; (code=exited, status=0/SUCCESS)
 Main PID: 4732 (nginx)
    Tasks: 2 (limit: 4682)
   CGroup: /system.slice/nginx.service
           ├─4732 nginx: master process /usr/sbin/nginx -g daemon on; master_process on;
           └─4763 nginx: worker process

Sep 08 21:40:25 admintuts systemd[1]: Reloading A high performance web server and a reverse proxy server.
Sep 08 21:40:25 admintuts systemd[1]: Reloaded A high performance web server and a reverse proxy server.
Nginx UFW Firewall Profile
Most of the time Nginx does not ship with a preconfigured ufw firewall profile, so we need to create that manually.
nikolas@admintuts:~$ sudo vi /etc/ufw/applications.d/nginxAnd paste the following:
[Nginx HTTP]
title=Web Server (Nginx, HTTP)
description=Small, but very powerful and efficient web server
ports=80/tcp

[Nginx HTTPS]
title=Web Server (Nginx, HTTPS)
description=Small, but very powerful and efficient web server
ports=443/tcp

[Nginx Full]
title=Web Server (Nginx, HTTP + HTTPS)
description=Small, but very powerful and efficient web server
ports=80,443/tcp
Nginx needs to be listening on ports 80 and 443, so we need to add the “Nginx Full” UFW profile like so:
<code class="language-bash">nikolas@admintuts:~$ sudo ufw allow 'Nginx Full'And then reload the firewall rules by:
nikolas@admintuts:~$ sudo ufw reloadPHP-FPM Configuration
Go to the ‘/etc/php/7.3/fpm’ directory and edit the ‘php.ini’ file.
nikolas@admintuts:~$ cd /etc/php/7.3/fpm
nikolas@admintuts:/etc/php/7.3/fpm$ sudo vi php.ini
And make the changes shown below. Uncomment the ‘cgi.fix_patinfo’ line and change the value to ‘0’. upload_max_filesize = 100M, post_max_size = 64M, max_execution_time = 300, and lastly choose your time zone. For reference, Europe/London was chosen, but you can change that to your own time zone, or the time zone the actual server resides. After that, save and exit.
cgi.fix_pathinfo = 0
upload_max_filesize = 100M
post_max_size = 64M
max_execution_time = 300
date.timezone = Europe/London
At this point, if you try to load a PHP page, you will receive a 502 Bad Gateway error. There is something very important that online tutorials often forget mentioning, and that is the PHP-FPM and NGINX need to run under the SAME USER and Group. There are 2 cases:
- If php-fpm user is different than the one Nginx is running under, then php-fpm won’t be able to write on disk. Php files will be able to be served, but uploading themes would result to an error.
- If php-fpm user is the same as the one Nginx is running under, then all is ok.
As stated in our nginx.conf configuration file, Nginx server runs under the “nikolas” user which belongs to the “nikolas” user group. Now, the last part. Edit the file www.conf located in “/etc/php/7.3/fpm/pool.d” , and change the user group under php-fpm runs under:
; Unix user/group of processes
; Note: The user is mandatory. If the group is not set, the default user's group will be used.
user = nikolas
group = nikolas
And,
; Set permissions for unix socket, if one is used. In Linux, read/write
; permissions must be set in order to allow connections from a web server. Many
; BSD-derived systems allow connections regardless of permissions.
; Default Values: user and group are set as the running user mode is set to 0660
listen.owner = nikolas
listen.group = nikolas
Next restart php-fpm to apply the changes, and check the service’s status:
nikolas@admintuts:~$ sudo systemctl restart php7.3-fpm
nikolas@admintuts:~$ sudo systemctl status php7.3-fpm
● php7.3-fpm.service - The PHP 7.3 FastCGI Process Manager
   Loaded: loaded (/lib/systemd/system/php7.3-fpm.service; enabled; vendor preset: enabled)
   Active: active (running) since Sun 2019-09-08 22:23:54 EEST; 6s ago
     Docs: man:php-fpm7.3(8)
 Main PID: 5473 (php-fpm7.3)
   Status: "Ready to handle connections"
    Tasks: 3 (limit: 4682)
   CGroup: /system.slice/php7.3-fpm.service
           ├─5473 php-fpm: master process (/etc/php/7.3/fpm/php-fpm.conf)
           ├─5492 php-fpm: pool www
           └─5493 php-fpm: pool www

Sep 08 22:23:54 admintuts systemd[1]: Stopped The PHP 7.3 FastCGI Process Manager.
Sep 08 22:23:54 admintuts systemd[1]: Starting The PHP 7.3 FastCGI Process Manager...
Sep 08 22:23:54 admintuts systemd[1]: Started The PHP 7.3 FastCGI Process Manager.
Congratulations, you now have a working server ready for a Wordpess installation! Incase you will want to install an other CMS, or just a normal php website, then only thing that you will have to change is the try_files directive in the virtual host config file.
Automated Bash Script
You can use the script below to have Nginx, PHP, and MySql installed and configured automatically. There will be only a minimal effort on your part. You will only have to change 3 variables that you see at the beginning of the script and replace them with your own details. The script will ask for your confirmation during user creation, MySql configuration, and PPA installation. Make sure to change my_user, domain_name, and server_ip with your own values.
#!/bin/sh
my_user=your_username
domain_name=your_domain_name
server_ip=your_server_ip

sudo apt update
sudo apt upgrade -y
sudo apt autoremove -y
sudo apt install gcc make perl
sudo apt install software-properties-common
sudo adduser ${my_user}
sudo mkdir /home/${my_user}/${domain_name}
sudo mkdir /home/${my_user}/${domain_name}/html_public
sudo chown ${my_user}:${my_user} -R /home/${my_user}
sudo chmod 755 -R /home/${my_user}
echo "Installing Nginx Web Server"
sudo add-apt-repository ppa:nginx/stable
sudo apt install nginx -y
sudo systemctl start nginx
sudo systemctl enable nginx
sudo nginx -v
echo "Setting Up Nginx Config Files.."
sudo rm /etc/nginx/nginx.conf
echo "user  ${my_user};
worker_processes  1; # the number of cores you want to use. Use auto to use the maximum number of cpu cores.
error_log  /var/log/nginx/error.log error;
pid        /var/run/nginx.pid;
events {
    worker_connections  1024;
}
http {
    map_hash_max_size 262144;
    map_hash_bucket_size 262144;
    types_hash_bucket_size 256;
    server_names_hash_bucket_size 256;
    sendfile    on;
    tcp_nodelay on;
    tcp_nopush  off;
    autoindex off;
    server_tokens off;
    keepalive_timeout  15;
    client_max_body_size 100m;
    #Just in case you want to use websockets
    map $http_upgrade $connection_upgrade {
        default upgrade;
        '' close;
    }
    include       /etc/nginx/mime.types;
    default_type  application/octet-stream;

    log_format  main '$remote_addr - $remote_user [$time_local] "$request"'
                     '$status $body_bytes_sent "$http_referer"'
                     '"$http_user_agent" "$http_x_forwarded_for"';
    access_log  /var/log/nginx/access.log  main;
    #=============Basic Compression=====================
    gzip on;
    gzip_static on;
    gzip_disable "msie6";
    gzip_vary on;
    gzip_proxied any;
    gzip_comp_level 6;
    gzip_buffers 16 8k;
    gzip_http_version 1.1;
    gzip_types text/css text/xml text/plain application/javascript image/jpeg image/png image/gif image/x-icon image/svg+xml image/webp application/font-woff application/json application/vnd.ms-fontobject application/vnd.ms-powerpoint;
    #===virtual hosts configuration files===
    include /etc/nginx/sites-enabled/*.conf;
}" > /etc/nginx/nginx.conf
echo "server {
server_name ${server_ip};
listen 80;
return 301 http://${domain_name}$request_uri; #replace http with https after you obtain the ssl certificate
}
server {
    server_name www.${domain_name};
    listen 80;
    listen [::]:80;
    keepalive_timeout   70;
    # Non-www redirect
    return 301 http://${domain_name}$request_uri; #replace http with https after you obtain the ssl certificate
}
server {
    server_name  ${domain_name};
    listen       *:80;
    return 301   http://${domain_name}$request_uri;
}
server {
    server_name ${domain_name};
    listen      80;
    listen      [::]:80;
    root        /home/${my_user}/${domain_name}/html_public; #this is the location of disk of where your sites files reside
    charset UTF-8;
    add_header X-Frame-Options SAMEORIGIN;
    add_header X-Content-Type-Options nosniff;
    add_header X-XSS-Protection "1; mode=block";
    add_header Referrer-Policy no-referrer;
location ~* .(jpg|jpe?g|gif|png|ico|cur|gz|svgz|mp4|ogg|ogv|webm|htc|css|js|otf|eot|svg|ttf|woff|woff2)(?ver=[0-9.]+)?$ {
    expires modified 1M;
    add_header Access-Control-Allow-Origin '*';
    add_header Pragma public;
    add_header Cache-Control "public, must-revalidate, proxy-revalidate";
    access_log off;
    }
    #access_log  logs/host.access.log  main;
    #LetsEncrypt Hidden Directory
    location ~ /.well-known {
        allow all;
    }
location / {
    index index.php;
    try_files $uri $uri/ /index.php?$args; #WordPress Syntax for try_files directive;
    }
error_page  404    /404.php;
#pass incoming requests to PHP-FPM service listening on a unix socket
location ~ .php$ {
    try_files       $uri =404;
    fastcgi_index   index.php;
    fastcgi_pass    unix:/run/php/php7.3-fpm.sock;
    fastcgi_split_path_info ^(.+.php)(/.+)$;
    fastcgi_param   SCRIPT_FILENAME  $document_root$fastcgi_script_name;
    fastcgi_intercept_errors on;
    fastcgi_ignore_client_abort off;
    fastcgi_connect_timeout 60;
    fastcgi_send_timeout 180;
    fastcgi_read_timeout 180;
    fastcgi_buffer_size 128k;
    fastcgi_buffers 4 256k;
    fastcgi_busy_buffers_size 256k;
    fastcgi_temp_file_write_size 256k;
    include fastcgi_params;
}
location = /robots.txt {
    access_log off;
    log_not_found off;
    }
location ~ /. {
    deny  all;
    access_log off;
    log_not_found off;
    }
}" > /etc/nginx/sites-enabled/${domain_name}.conf
echo "Setting up Native Ubuntu Firewall rules..."
sudo ufw allow ssh
sudo ufw allow http
sudo ufw allow https
sudo ufw allow ftp
sudo ufw enable
echo "Setting up MySql Server..."
sudo apt install mysql-server mysql-client -y
sudo systemctl start mysql
sudo systemctl enable mysql
sudo mysql_secure_installation
echo "Downloading PHP 7.3 with PHP-FPM..."
sudo add-apt-repository ppa:ondrej/php
sudo apt upgrade
sudo apt install php7.3 php7.3-fpm php7.3-mysql php7.3-cli php-common php7.3-common php7.3-json php7.3-xml php7.3-xmlrpc php7.3-opcache php7.3-readline libpcre2-8-0 php-pear php7.3-opcache  php7.3-bcmath php-curl php7.3-curl php7.3-gd php7.3-mbstring php7.3-zip php7.3-bz2 mcrypt php-gmp php-mbstring php-gd php-tcpdf php-zip -y
sudo php -v
sudo systemctl start php7.3-fpm && sudo systemctl enable php7.3-fpm
echo "Configuring PHP..."
sudo sed -i "/;cgi.fix_pathinfo/ccgi.fix_pathinfo=0" /etc/php/7.3/fpm/php.ini
sudo sed -i "/upload_max_filesize = 2M/cupload_max_filesize = 100M" /etc/php/7.3/fpm/php.ini
sudo sed -i "/post_max_size = 8M/cpost_max_size = 64M" /etc/php/7.3/fpm/php.ini
sudo sed -i "/max_execution_time = 30/cmax_execution_time = 300" /etc/php/7.3/fpm/php.ini
sudo sed -i "/;date.timezone/cdate.timezone=Europe/London" /etc/php/7.3/fpm/php.ini
echo "Configuring PHP User Permissions..."
sudo sed -i "/user = www-data/cuser = ${my_user}" /etc/php/7.3/fpm/pool.d/www.conf
sudo sed -i "/group = www-data/cgroup = ${my_user}" /etc/php/7.3/fpm/pool.d/www.conf
sudo sed -i "/listen.owner = www-data/clisten.owner = ${my_user}" /etc/php/7.3/fpm/pool.d/www.conf
sudo sed -i "/listen.group = www-data/clisten.group = ${my_user}" /etc/php/7.3/fpm/pool.d/www.conf
sudo systemctl reload php7.3-fpm
sudo systemctl reload nginx
echo "Ubuntu configuration finished.."